

I am thrilled to be returning on the Simple Life Pattern Company Holidays Blog Tour! I love the challenge of creating something special, and this amazing group of makers always push me to challenge myself!
As with all the best blog tours, we have a discount code to give you 30% off all patterns, as well as a giveaway! Read through to the end to get all the important details!
Oh my stars, where do I start ? If you love to hack and mash patterns with a little bit of problem solving thrown in, you will love this project!

My personal challenge for this year’s post was to make something amazing enough to take its place in the SLPCo Holiday Tour, while at the same time making something really wearable for my girls.
That sounds pretty easy surely? You see most little girls love dresses and feeling like a princess! Not my girls… They like denim shorts and Mickey Mouse T-shirt’s! Oh and tie-dye, if it’s tie-dyed they will wear it! #eyeroll

I made the most amazing special occasion dress last year for the tour. It was such a rewarding and sentimental project, but it has stayed hanging lonely in the wardrobe pretty much ever since! This year I decided something a little less formal was the go…
I always get some input from my girls when I’m sewing for them, so I set out to lose myself on the Art Gallery Fabrics website to give them a few options to choose from! I love when AGF sponsors my blog posts with fabric, there are so many amazing collections to choose from!

I decided on a two fabric combination to make matching, but not quite matching dresses. I love a pop of contrast! I wanted to make a combination that looked bright and festive without pigeon holing it as a “Christmas dress”.

I gave the girls a few options and I’m so glad we all agreed on this combination as our favourite! It is from the Trinket Fusion Collection and the WHOLE collection really spoke to me! Those earthy autumnal colours are my happy place.

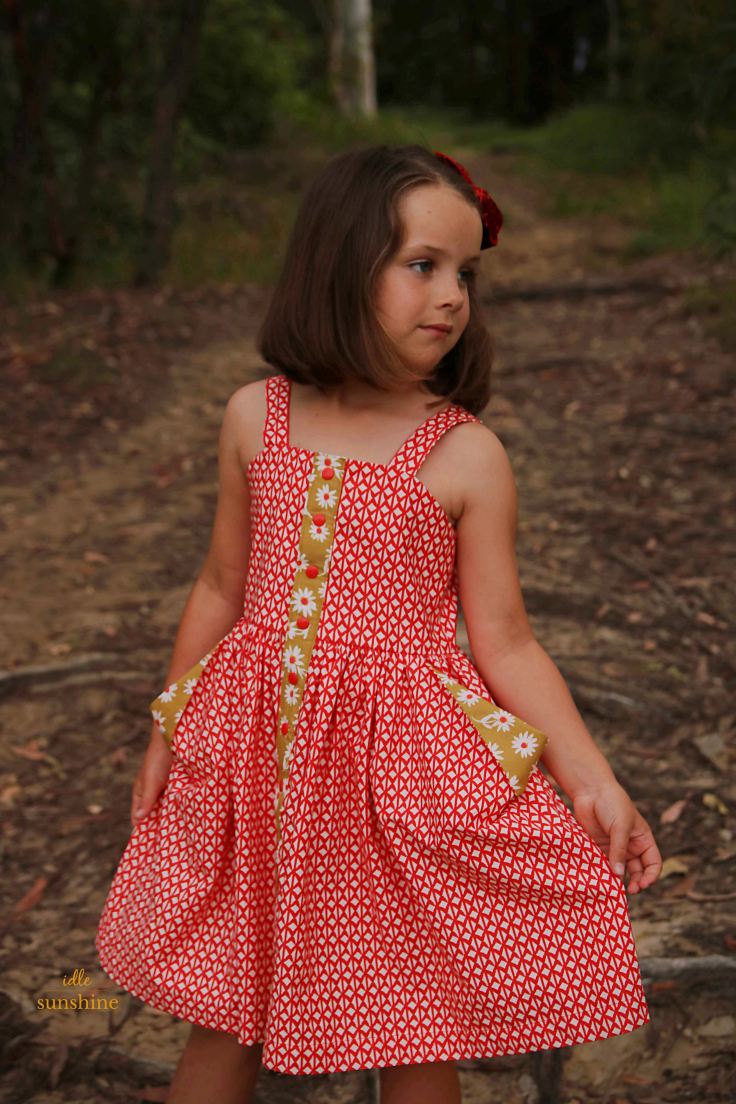
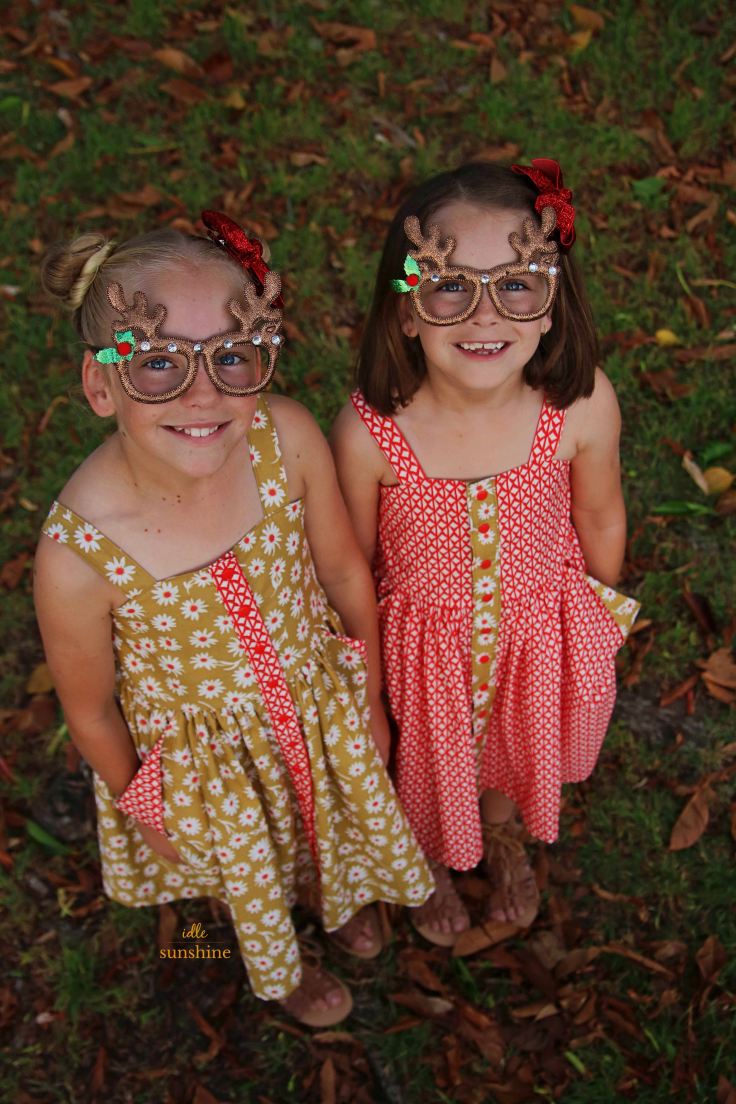
My eldest loved the “Flower Glory Trinkets”, she is a retro/vintage loving girl after my own heart! This print was originally designed by Bonnie Christine. My youngest chose the gorgeous red geometric print called “Wallpaper Trinkets”, originally designed by April Rhodes. Together they are a match made in heaven!

To create these dresses I used the bodice from the Simple Life Patterns Laguna Dress and teamed it with the skirt and pockets from the Newport Dress! Easy right? Then I decided to make things a little more complicated…

I decided to remove the partial placket opening from the back of the dress and add a full placket down the centre front! I wanted to use my contrasting fabrics and I thought this would be a great feature.

So step one was to calculate the centre of the back bodice and cut it as one piece on the fold. Then I cut the front bodice main & lining as 2 pieces each, instead of on the fold. I also added 1″ in length to all the bodice pieces, just because I felt like it would work…
I decided I wanted my finished placket to be 3cm wide, and then calculated the width of my placket pattern piece by doubling my 3cm and adding 2 seam allowances of 1cm each. So I cut my placket pieces 8cm wide and roughly estimated the length by adding the bodice and skirt heights together and leaving myself a few inches extra, just in case.

I had to recalculate shoulder strap position taking into account the changes I had made, and started construction by sewing up my bodice quite like the Laguna pattern instructions, leaving the centre front unsewn.

I then cut the skirt front piece down the centre and added the pockets as per the Newport pattern instructions. Then I sewed the side seams and gathered my skirt to fit the bodice using 2 rows of gathering stitches. Once the skirt was attached to the bodice I interfaced the centre 6cm width (and full length) of my placket pieces. I then folded and ironed 1cm seam allowances along both long edges and then pressed it in half lengthways, wrong sides together.
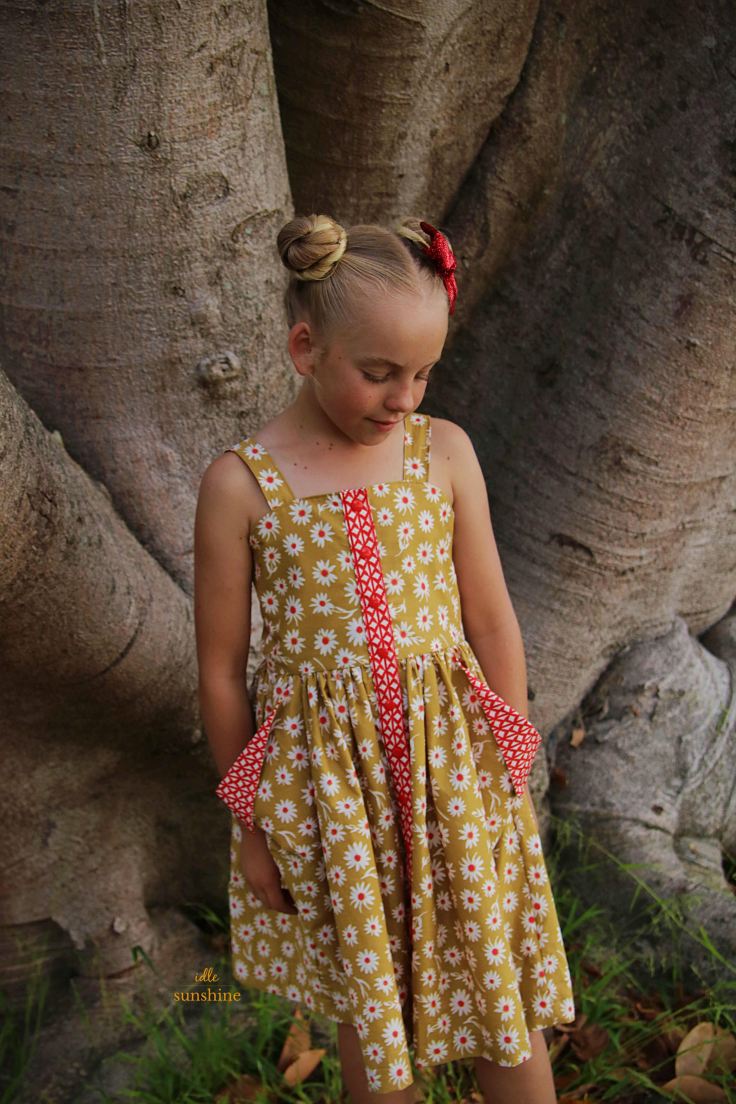
To attach the placket I lined up the long raw edge of the placket to the centre front of the dress, right side of placket laying on top of the wrong side of the dress, making sure to leave an inch or 2 overhang for both the top and bottom. I stitched in the first ironed fold (1cm from the edge). Then wrapped the placket around to the front, folding over the top and bottom and wrapping it inside the placket. The seam allowance stays folded under and you topstitch from the front to finish it. If you pin it carefully, those stitches on the back should stitch in the ditch and look pretty neat from the back as well as the front.

Now is about the time you discover you have lost your snap pliers!! Oh my gosh I spent days looking and they have obviously gone on vacation somewhere! Then after you panic and search for a couple of days, you remember you actually have a big snap press you’ve never even tried! So I got that together and got both dresses done, but only one would snap up! I have no idea why!! They were both Kam branded snaps… but those tan/mossy ones were a complete failure! I then made such a mess removing the snaps in the press, I really just wanted my pliers 😦
In the end I didn’t have quite enough red ones to finish it off, but a couple of maroon ones on the back will never be seen! Shhhh!
After the snaps were complete I hemmed the dresses by folding under the overlocked edge and then doing a 3cm hem. I figured I had a little extra length after I lengthened the bodice, and I like a deep hem.
Photos were then put back day after day… The KAM snap stuff up… dance rehearsal day, a reunion catch up at the beach (but the beach had washed away so that didn’t work as a location either)… Early morning was super foggy before school… Stress levels were rising!
FINALLY! These smiling faces braved a swarm of mosquitoes which required a quick location change before we got the shots we needed. I told you this project really tested us!!!

They insisted props were necessary for a Christmas themed shoot! It was just the fun we needed to finish off ❤
Patterns provided by Simple Life Pattern Company:
Simple Life Pattern Company Newport Pocket Top & Dress
Simple Life Pattern Company Laguna Double Flutter Panel Pocket Dress
Fabric provided by Art Gallery Fabrics:
Trinket Fusion Collection – Flower Glory Trinkets & Wallpaper Trinkets
If you’ve found some inspiration here, or from the other ladies on this tour, head over to Simple Life Pattern Co for their winter sale!! All patterns (minus the brand new Betty) are on sale for 30% using code FALLINTOSLPCO. Sale ends the 12th at midnight so get shopping!

Blog Tour Schedule
November 5 – Kutti Couture – SLPCO Team
November 6 – Wonderfully Handmade – Ammon Lane
November 7 – Kainara Stitches – Idle Sunshine – Pearberry Lane
November 8 – Sew Twirly – Sew Sophie Lynn – Bonnie and Blithe
November 9 – It’s Liesel – Candice Ayala
For your chance to win a
$30 Harts Fabric Voucher
and a $50 SLPCo Pattern Voucher,
don’t forget to enter the
Rafflecopter giveaway!

Some of the links in the post above are “affiliate links.” This means if you click on the link and purchase the item, I will receive an affiliate commission. Regardless, I only recommend products or services I believe will add value to my readers.

November 8, 2018 at 3:30 pm
These dresses turned out so great Brooke! And those glasses are the cutest! 🤣 Thanks for joining the tour this year.
LikeLiked by 1 person
November 9, 2018 at 5:25 am
Wow; these are adorable!!! I love the color combinations os much!
LikeLiked by 1 person
November 10, 2018 at 1:02 am
I love your mash up so much! Pattern hacks totally make my mind crazy and I love all that you were able to pull off here. I especially love that you made dresses that will get worn and loved! Well done mama!
LikeLiked by 1 person
November 10, 2018 at 3:35 am
These mash ups were spot on Brooke! The girls, the dresses and the shoot location were perfectly captured!
LikeLiked by 1 person
November 13, 2018 at 12:32 pm
Love the dresses
LikeLiked by 1 person